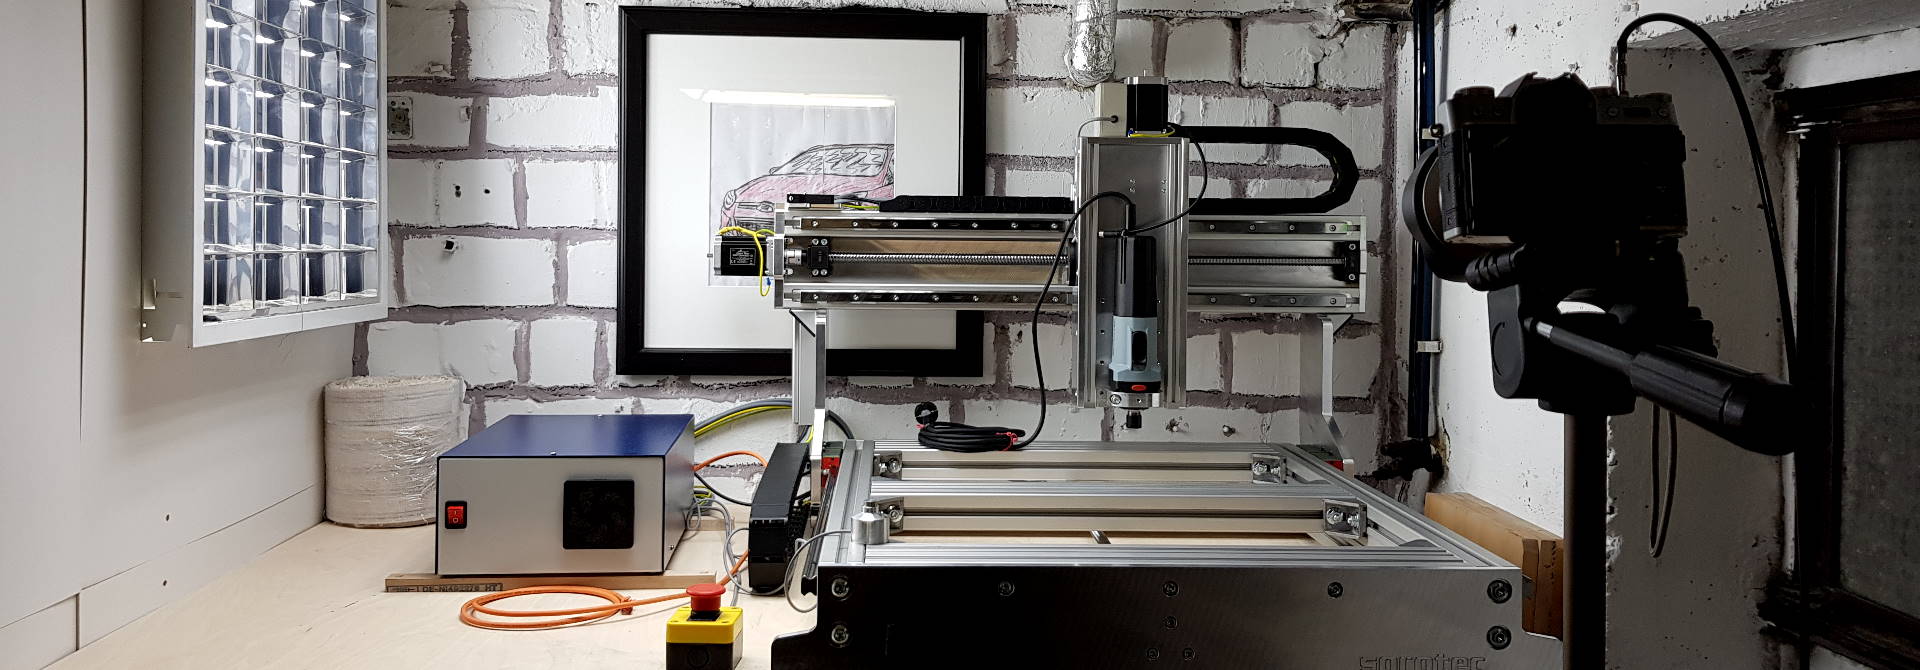
CNC Teil1 - Portalfräsmaschine
CNC Portalfräsmaschine - für Anfänger
Es ist Winter 2021, und meine erste CNC-Maschine wird bald geliefert. Es wird ein Bausatz sein, der aus einer Menge Pakete und noch mehr Einzelteilen besteht. Ich habe die Maschine bestellt, weil ich Prototypen für AnywhereAmps schneller und genauer fertigen möchte. Und natürlich um ein paar weitere Hardware-Projekte umzusetzen, die mir schon länger im Kopf herumschwirren.
Moment mal
 Oh, Ok. CNC bedeutet computer numerical control und beschreibt, wie die Maschine gesteuert wird - nicht von Hand, sondern durch Instruktionen eines Computers.
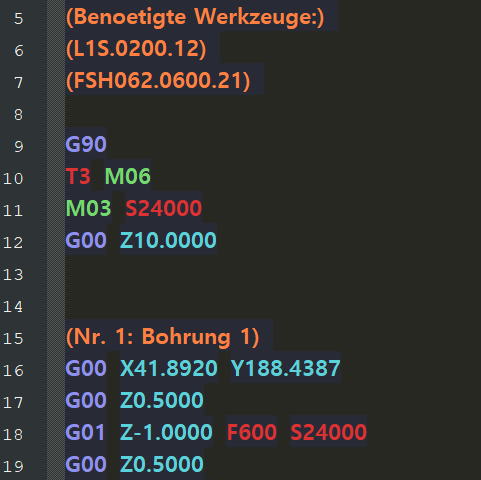
Diese werden G-Code genannt, und sind in der häufig benutzten Interpretersprache RS274-NGC geschrieben, die Industriestandard für computergesteuerte Bearbeitungszentren geworden ist.
Eine Portalfräsmaschine ist einer Oberfräse nicht unähnlich. Der Fräsmotor ist auf einem Gestell montiert, das ihn in (meist) drei Achsen X, Y, Z mithilfe von Schrittmotoren oder Servomotoren bewegt. Ein Rechner steuert diese Bewegungen und ist so in der Lage, nahezu beliebige Formen zu schneiden. Die Kinematik der Portalfräsmaschine ist ähnlich zu der von 3D-Druckern, obwohl sie natürlich ganz unterschiedliche Anforderungen an die Mechanik haben - eine Portalfräsmaschine muss viel stabiler, steifer und schwerer konstruiert werden, da die Rahmenkonstruktion sämtliche Schneid- und Beschleunigungskräfte aufnehmen muss.
Natürlich sind CNC-Maschinen nicht auf 3D-Drucker und Fräsmaschinen beschränkt. Es gibt CNC-Drehmaschinen, Plotter, Laserschneider, Wasserstrahlschneider und viele mehr. Streng genommen sind sogar Industrieroboter CNC-Maschinen.
Fragen
Dies sind einige der Fragen, die ich hatte, bevor ich dieses ziemlich teure Stück Technik gekauft habe. Einige davon lassen sich leicht in ein paar Zeilen beantworten, andere würden wahrscheinlich einen ganzen Artikel für sich allein füllen.
CNC-Fräsmaschine
Beschleunigt sie wirklich meinen Prototyping-Prozess?
Ich weiß es noch nicht, aber ich hoffe es. Die Holzarbeiten für einen einzigen Prototyp nehmen etwa 8 Stunden meiner Zeit in Anspruch. Am meisten Zeit verschlingen die Vorbereitungen für den Zuschnitt, die Messungen und das Abpausen. Allein der Lautsprecheradapter von AnywhereAmps Alpha mit seiner gewölbten Oberfläche nimmt mehr als eine Stunde Fertigungszeit in Anspruch.
Mit einer CNC-Portalfräsmaschine hoffe ich, mehr wie ein Plätzchenbäcker zu werden: Alle Teile für AnywhereAmps (mit Ausnahme des zylindrischen Gehäuses) in einem einzigen Stück Sperrholz zu verschachteln, die Maschine die Arbeit machen zu lassen und nach einer Weile nur noch minimale Nacharbeiten beim Ausschneiden und Schleifen der Teile zu erledigen.
Und wenn ich einen weiteren Prototyp oder andere Lautsprecherdurchmesser haben möchte: Ich passe einige Parameter in meinem CAD-Tool an, stelle die Werkzeugwege neu ein, schicke sie an den Computer der Maschine, spanne ein neues Stück Sperrholz ein und drücke auf “Auftrag ausführen”. Fertig (in der idealen Welt).
Andererseits braucht das Einarbeiten in die ganzen Software-Tools auch seine Zeit. Mein Einführungsartikel über FreeCAD hier verlinkt ist ein Beispiel dafür.
Mehr Geld für Portalhardware oder lieber für den Spindelantrieb ausgeben?
Das ist eine Frage an die Experten, die ich selbst erst beantworten kann, wenn ich schon eine Weile eine CNC besitze. Ich habe mich dafür entschieden, mehr Geld für das Portal und weniger für die Spindel auszugeben, und zwar aus mehreren Gründen, die sich aus dem Bauch heraus ergeben:
- Das Portal ist meine Maschine, die Spindel nur ein Teil davon.
- Die Spindel ist günstiger, leichter auszutauschen und bei weitem nicht so aufwendig zu montieren wie das Portal, also möchte ich, dass das Portal eine Konstante ist.
- Wenn ich durch die Fähigkeiten meiner Portalfräsmaschine eingeschränkt bin, müsste ich zuerst herausfinden, warum, und dann an einzelnen Komponenten herumschrauben, um sie zu verbessern. Wenn die Spindel der limitierende Faktor ist, kaufe ich mir einfach eine stärkere und gut ist.
Wie viel Spindelleistung?
Das ist meine erste schwierige Frage. Ich bin mir fast sicher, dass ich für meine Holzbearbeitung kein 2,2-kW-Monster brauche. Um anständige Vorschubgeschwindigkeiten zu erzielen und genügend Spielraum für Dichteunregelmäßigkeiten wie Astlöcher zu haben, könnte es eine gute Idee sein, sich im Leistungssegment der Handoberfräse zwischen 700W und 1200W zu orientieren, was mir immer gute Dienste geleistet hat. Ich habe mich für eine 1000W Universalmotor Maschine entschieden.
Im Gegensatz zu den oft als “HF-Spindeln” (HF = Hochfrequenz) bezeichneten Drehstrommotoren benötigen sie keinen Frequenzumrichter und keine externe Kühlung, da ihr Lüfter auf die Welle geschraubt ist. Andererseits sind sie in der Regel lauter (der Lüfter ist nicht unabhängig von der Motordrehzahl) und weniger effizient (Lüfterverluste, Kommutierungsverluste, Kupferverluste, Magnetisierungsverluste usw.) Ich habe im Internet nur grobe Zahlen zum Wirkungsgrad gefunden, also nehmen wir mal an:
1000W Universalmotorantrieb *30% Gesamtwirkungsgrad inkl. Elektronik & Lüfter: 300W @ Motorwelle
700W Asynchronmaschine *85% Wirkungsgrad *90% Wirkungsgrad Steuerung *97% external cooling: 520W @ motor shaft
Das wäre ein gewaltiger Unterschied, so dass sich eine spätere Aufrüstung doch lohnen könnte. Außerdem reichen für eine HF-Spindel im Vergleich zu einem konventionellen Antrieb geringere Wattzahlen aus.
Automatischer Werkzeugwechsler - ja oder nein?
Das hängt wohl davon ab, was ich brauche. Ich kaufe mir zunächst einen einfachen Fräsmotor mit digitaler Drehzahlregelung als Spindel. Ein “richtiger” Werkzeugwechsler - richtig bedeutet, dass ich auch Werkzeugschäfte von 10mm und größer montieren kann und gewuchtete Spannzangen, 3-Phasen-Antrieb mit eigenständiger Kühlung und Frequenzumrichter habe - würde ~10 mal so viel kosten. Außerdem kostet jedes ER20-Spannzangenfutter für den Werkzeugwechsler mal eben die Hälfte meines Fräsmotors. Davon bräuchte ich mehr als eine, wenn der Werkzeugwechsler Sinn machen soll. Und ich bräuchte eine Druckluftanlage mit Schaltkasten usw. Das alles zusammen würde die Kosten für die Portalfräse locker überschreiten!
Schlussfolgerung: Wenn ich die CNC in Zukunft sehr oft benutzen werde und wenn meine Projekte unbedingt häufige Werkzeugwechsel zum Schruppen, Glätten, Fasen, 3D usw. erfordern, dann könnte ich diesen teuren Schritt in Betracht ziehen. Vielleicht. Irgendwann.
Welche Größe ist die beste?
Idealerweise könnte man für die Bearbeitung von Sperrholzplatten eine ganze Standardplatte von “1250mm x 2500mm” oder einen Bruchteil davon, z.B. “610mm x 1250mm”, auflegen. Aber selbst die kleineren Platten würden nicht in den Keller meiner kleinen Wohnung passen. Also entschied ich mich für eine mit 840mm x 740mm Auflagefläche.
Für Ihre Wahl: Prüfen Sie, ob Sie platzmäßig eingeschränkt sind. Wenn nicht, dann machen Sie sich gründlich Gedanken darüber, was Sie mit Ihrer Maschine machen wollen. Die Größe der Maschine ergibt sich automatisch, wenn Sie wissen, wofür Sie sie hauptsächlich einsetzen wollen.
Plug-and-play oder ein Bausatz?
Dies hängt von mehreren Aspekten ab: Von Budget, der Zeit, die man zu investieren bereit ist, und natürlich davon, ob man zumindest ein bisschen Talent im Umgang mit Schraubendrehern, Muttern, Abisolierzangen und dem Lötkolben hat. Es kommt auch darauf an, ob einem jede Schraube Ihrer Maschine persönlich bekannt sein soll.
Kugelumlaufspindeln zum Bewegen der Achsen?
Flinke Eilgänge, hohe Wiederholgenauigkeit durch reduziertes oder eliminiertes Spiel oder höhere Vorschubgeschwindigkeiten? Fräsen im Gleichlauf, um die Oberflächenqualität und die Standzeit der Werkzeuge zu erhöhen? Wenn Sie einen dieser Punkte bejahen, sollten Sie das zusätzliche Geld für Kugelumlaufspindeln ausgeben.
zusätzliche Vielseitigkeit?
Wie im Abschnitt Moment mal beschrieben, wäre das Portal selbst auch für andere Zwecke geeignet. Es gibt Schleppmesser zum Plotten, 3D-Druckköpfe und sogar Gravurlaser, die bei Bedarf an das Portal angeflanscht werden könnten.
Um sich darauf vorzubereiten, ist eine Spindel, die auf den Euronorm-Hals mit einem Durchmesser von 43 mm passt möglicherweise die beste Wahl, da die meisten anderen Werkzeuge auch für diese Passform erhältlich sind. Dies erleichtert einen eventuellen Umbau. Wobei andererseits die meisten Maschinen, die etwas taugen, spezialisiert sind auf ihr Fach - ein 3D-Drucker schafft wahnwitzige Beschleunigungsvorgänge, der Plotter spart beim Platzverbrauch und die CNC-Fräse ist nunmal wegen der Schneidkräfte stabiler gebaut.
Allgemeine Fragen
Entsteht dabei viel Staub?
Ja. Besorgen Sie sich eine gute Staubabsaugung. Ich würde ein Zyklonsystem oder einen dieser riesigen Textilbeutel empfehlen, die normalerweise bei stationären Sägen verwendet werden. Wenn Sie Ihre Maschine regelmäßig benutzen, reicht die Aufnahmekapazität eines Werkstattsaugers allein möglicherweise nicht aus.
Außerdem sollten Sie den Staubsauger gut erden (z. B. indem Sie die Erdungsleitung(en) mit dem Erdungspunkt Ihres Schaltkastens verbinden) und antistatische Saugschläuche kaufen, die Sie an die Erdung des Staubsaugers oder des Staubbehälters anschließen können. Auf diese Weise vermeiden Sie, dass Sie jedes Mal, wenn Sie vakuumbezogene Dinge berühren, einen leichten Schlag bekommen, und Sie können einen schwer auszumachenden Grund dafür ausschließen, dass Ihre Maschine verrückt spielt, z. B. plötzliches Einfrieren der Software, zufälliges Erkennen von Not-Aus-Ereignissen durch die Steuerung, Falschauslösung eines Referenzschalters oder sogar Schluckauf bei Schrittmotoren. Es gibt viele Fälle in verschiedenen Foren, in denen dies die Ursache war oder gewesen sein könnte, z. B. hier.
Ist sie laut?
Ja. Der Geräuschpegel ist vergleichbar mit dem einer Handoberfräse. Sie ist schon im Leerlauf laut, und es wird noch schlimmer, wenn sie durch Material fährt. Es könnte also eine gute Idee sein die leiseren, aber teureren Hochfrequenzspindeln mit externer Kühlung zu kaufen. Darüber hinaus sollte (und je nach den örtlichen Vorschriften sogar muss) Ihre Maschine aus Sicherheitsgründen, aber auch zur Lärmminderung, eine Einhausung erhalten. Sie hilft auch dabei, Feinstaub in der Raumluft zu reduzieren.
Die Geräuschentwicklung hängt aber auch stark vom verwendeten Fräser ab. Meiner Erfahrung nach klingen kurze Planfräser mit großem Durchmesser und 10-mm-Schaft angenehmer und sind vielleicht sogar weniger laut als Fräser mit Fischschwanz oder besonders langem Schaft.
Wie sieht der Arbeitsablauf aus?
Hier ist eine vereinfachte Darstellung des Arbeitsablaufs mit einer CNC-Maschine.
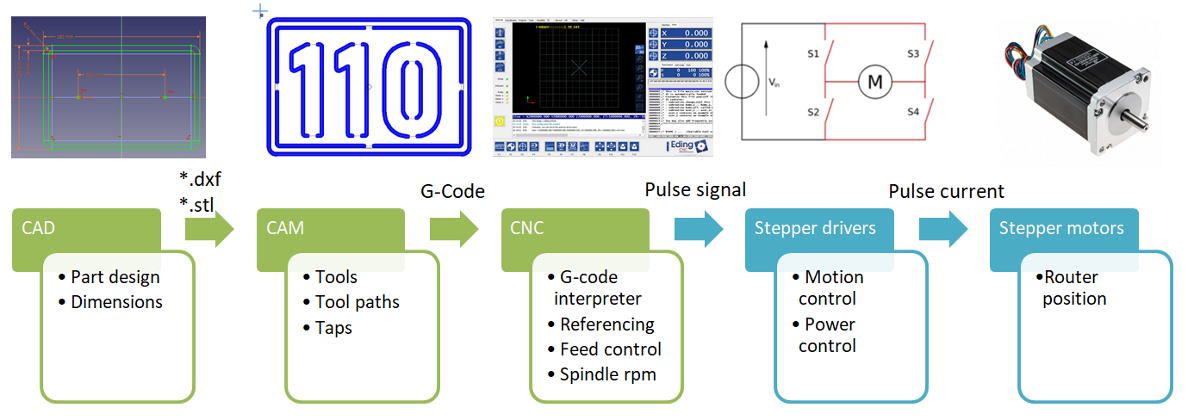 Ähnlich wie beim Handwerk beginnt alles mit einer Idee. Die Zeichnungen und Bemaßungen der Teile werden nicht auf einem leeren Blatt Papier, sondern in einem Computer Aided Design-Tool erstellt. Die Zeichnung oder 3D-Modelldatei wird dann in einem Computer Aided Manufacturing Tool weiterverarbeitet, wo geeignete Fräswerkzeuge ausgewählt, die Frässtrategien festgelegt und die Werkzeugwege erzeugt werden. Die resultierende G-Code-Datei wird dann an die eigentliche CNC Software gesendet, die die Schrittmotortreiber steuert. Diese senden Stromimpulse an die Schrittmotoren, die wiederum die Maschine mechanisch verfahren, um das Teil zu fertigen.
Fragen zum Betrieb
Fräsen im Gleich- oder Gegenlauf?
Dies ist eine Entscheidung, die in der CAM-Software getroffen wird.
Fräsen im Gegenlauf = der Fräser “schnitzt” in das Material, seine Schneiden drehen sich entgegen der Materialtransportrichtung. Der Gegenlauf wird bei allen Kreissägen verwendet die ich kenne, um Rückschläge zu vermeiden oder das Werkstück auf dem Tisch zu halten. Gleichlauffräsen = der Fräser “frisst” sich in das Material, seine Schneiden rotieren mit der Transportrichtung. Der Fräser neigt dazu, sich selbst in das Material zu ziehen. Weitere Informationen z.B. auf harveryperformance oder tormachs blog.
Für welche der beiden Möglichkeiten Sie sich entscheiden sollten, hängt von der Steifigkeit und dem Gewicht Ihrer Maschine, den Drehmoment Ihres Schrittmotors, der Leistung Ihrer Schrittmotorantriebe und dem Material ab, das Sie bearbeiten. Wenn Sie eine steife, schwere, leistungsstarke Maschine (mit Kugelumlaufspindeln) haben und mit eher weichen Materialien arbeiten, sollten Sie das Gleichlauffräsen verwenden. Beobachten Sie Ihre Maschine genau, um zu sehen, ob sich alles glatt anfühlt und anhört (!). Im Zweifelsfall sollten Sie im Gegenlauf fräsen. Arbeiten Sie bei handgeführten Oberfräsen immer den Gegenlauf!
Nachtrag: Ich fräse Dibond im Gegenlauf mit guten Ergebnissen, Acrylglas und Holz jedoch bearbeite ich im Gleichlauf.
Wie spannt man das Werkstück schnell und einfach auf?
Das hängt wiederum von Ihrem Material ab:
- Große Platten: Vakuumtisch oder Anschlag mit Klemmen, die die Platte gegen den Anschlag drücken
- Kleine Platten: Klemmen oder Verschraubung auf dem Fräsbett
- Kleine Blöcke: Schraubstock
- Unregelmäßige Formen: Klemmen, die das Material auf dem Fräsbett niederhalten
- Beidseitiges Fräsen: projektspezifische Vorrichtungen, die das Material in Position halten
Hmm, die Opferplatte mit Anschlag wird wahrscheinlich eins meiner ersten Projekte mit der neuen Maschine.
Mit welchen Bits / Fräsern sollte man beginnen?
Ich würde für den Anfang die folgenden allgemeinen Fräser empfehlen. Sie sollten natürlich in Herstellung, Spiralform, Nutenzahl usw. zum verwendeten Material passen.
- Klassischer Schaftfräser mit
6mmoder 1/4”, Spirale mit15-30° 2mmSchaftfräser mit Freischnitt für feines Material oder kleine Löcher60°und90°Gravierfräser für Gravuren und Fasen- Planfräser für großflächiges Fräsen
Mein Schwerpunkt ist Holz, was sind geeignete Vorschübe und Drehzahlen?
Birkensperrholz ist hart aber nachgiebig. Die geeigneten Werte berücksichtigen immer die Stabilität der Maschine, die Drehmomente der Schrittmotoren und die Spindelleistung.
Wichtig ist, dass der Fräser Späne erzeugt und keinen Staub. Deshalb sollten niedrige Vorschubgeschwindigkeiten bei hohen Spindeldrehzahlen vermieden werden. Für den Anfang in Holz: Verwenden Sie die Hälfte Ihres Werkzeugdurchmessers als Tiefe pro Durchgang, berechnen Sie die Spindeldrehzahl mit der Formel für Vorschübe und Drehzahlen oder einem Rechner aus dem Internet, und probieren Sie diese aus. Schauen Sie sich die Späne an. Hören Sie der Maschine bei der Arbeit zu. Hört sie sich “gut” an? Erhöhen Sie die Tiefe pro Durchgang oder die Vorschubgeschwindigkeit allmählich und hören Sie an dem Punkt auf, an dem entweder Ihre Spindel gestresst klingt, Ihr Finish schlechter wird oder Sie sich mit Ihrer Maschine nicht mehr sicher fühlen. Drehen Sie wieder eine Stufe zurück, und das könnte Ihre ideale Vorschubgeschwindigkeit und Durchgangstiefe für das Material und den Fräser sein, den Sie gerade verwenden.
Für meine Maschine habe ich mich für F3500mm/min = 138in/m bei S24000U/min und einer Tiefenzustellung in Höhe des Fräsdurchmessers Z+6mm, Bahnüberlappung 10% entschieden. Für die Recherche habe ich die folgenden Websites benutzt: cnccookbook, cnc-lehrgang sowie Webseiten von Werkzeugherstellern wie Sorotec.