CNC Part1 - Portal milling machine
CNC Portal Milling Machines - a beginner’s view
My first computerized milling machine will be delivered very soon, in form of a lot of packages with even more parts inside that require assembling. I ordered it to speed up my AnywhereAmps prototyping process. And of course to realize some other hardware projects that I had in mind, but was never able to build. Yet.
Wait, what?
 Oh, Ok. CNC means computer numerical control and describes how the tool is controlled - not by hand but by code.
This is called G-Code, a widely used language to tell CNC machines like my portal milling machine what to do.
A portal milling machine is like a router, just not hand-held. It is mounted on an apparature that can move the router in all three axes X, Y, Z with the help of stepper motors or servo motors so that a computer can control its movement and cut any path you like. Its way of operating is similar to a 3D printer, although the mechanics of the two have completely different requirements - a portal milling machine has to be constructed much more rugged, heavy, and stiff than a 3D-printer as it has to take all forces created by cutting through material.
Of course, CNC machines are not limited to 3D printers and routers. There are CNC lathes, plotters, laser cutters, water jet cutters and many more. Strictly speaking even 6+ axis industry robots are CNC machines.
Questions
These are some of the questions I had before actually buying this pretty expensive piece of technology. Some of them are easy to answer in just a few lines, but some likely take a whole article on their own.
CNC router decision
Does it really speed up my prototyping process?
I don’t know yet, but I hope so. Consider this: Woodworks for a single prototype take roughly 8h of my time. Most time consuming are preparations for cutting, measurements, and tracing. What takes more than an hour of manufacturing time alone is AnywhereAmps Alpha’s speaker adapter with its curved surface.
With a CNC portal milling machine, I’m hoping to become more like a biscuit maker: Nesting all parts for AnywhereAmps (apart from the cylindrical housing) within a single piece of plywood, having the machine do the work and, after a while, just minimal finalizing work for cutting and sanding the parts.
Plus, if I want another prototype or have other speaker diameters: Adjust some parameters within my CAD tool, rebuild tool paths, send to the machine’s computer, clamp a fresh piece of plywood and hit “run job”. Done (in the ideal world).
On the other hand, the software tools process takes its time, too. Find my introduction article on FreeCAD linked here as an example.
Spend more money on portal hardware or rather on spindle drive?
This is a question to the experts and I’ll only be able to answer it myself after a while of owning a CNC. I chose to spend more money on the portal and less on the spindle for a couple of gut-feeling reasons:
- The portal is my machine, the spindle just a component of it.
- The spindle is cheaper, more easy to exchange, and by far less work to mount than the portal so I’d want the portal to be a constant
- If I’m limited by the capabilities of my portal milling machine, I’d have to first figure out why, and then fiddle with individual components to improve. If the spindle is the limiting factor, I’ll just buy a more powerful one.
How much spindle power?
That’s my first hard one. I’m almost certain that for my woodworking stuff, I don’t need a 2.2kW monster. To get decent feed rates and to maintain enough headroom for density inconsistencies like branch forks, it might be a good idea to orientate in the hand-router wattage segment between 700W and 1200W which always served me well. I chose a 1000W universal motor machine.
In contrast to their three-phase induction machine counterparts often called “HF-Spindles” (HF = High Frequency), they don’t require a variable frequency drive and external cooling as their fan is bolt-on their shaft. On the other hand, they tend to be louder (the fan is not independent off the motor’s RPM) and less efficient (fan losses, commutation losses, copper losses, magnetization losses etc.) I found only rough figures on the internet when it comes to efficiency, so let’s assume:
1000W universal motor drive *30% total efficiency incl. Electronics & fan: 300W @ motor shaft
700W asynchronous drive *85% efficiency *90% VFD efficiency *97% external cooling: 520W @ motor shaft
This would be a huge difference still, so an upgrade at a later point in time might be worth after all. Plus, lower wattage ratings will suffice for a HF-spindle compared to a conventional drive.
Automatic Tool Changer - yes or no?
It depends on what I need, I guess. I’m buying a simple AC hand-router with digital speed control as a spindle first. A “proper” tool changer - proper meaning that I can also mount tool shafts of 10mm and bigger, have balanced collets, 3-Phase drive with stand-alone cooling and variable frequency drive - would cost ~10 times as much. Plus, each ER20 collet chuck for the tool changer easily comes at 1/2 price of the simple AC hand-router cost. Of which I’d require more than one if I want the tool changer to make sense. And I’d need a compressed air equipment with control box etc. The total of this would easily outweigh the portal milling machine’s cost!
Conclusion: If I’ll be using the CNC very often in the future and if my projects absolutely require frequent tool changes for roughing, smoothing, chamfers, 3D etc., then I might consider this expensive step. Maybe. In the distant future.
Which size is best?
Ideally, for working with plywood sheets, it could load a full standard sheet of 1250mm x 2500mm or a fraction of it, e.g. 610mm x 1250mm. But even the smaller ones wouldn’t fit my tiny flat’s cellar. So I chose one with 840mm x 740mm clamping area.
For your choice: Check out if you’re constrained in space. If not, then thoroughly make up your mind about what you want to do with your machine. The machine size will fall into place automatically when you know your primary use cases.
plug-and-play or an assembly kit?
This depends on multiple aspects: Your budget, time you’d like to invest, and of course, if you’re at least a bit talented with screwdrivers, nut runners, cable strippers, and the soldering iron. It is also a matter of if you’d like to or need to know every bolt of your machine.
ball screws for moving the axes?
Do you want rapid moves, high repeatability due to reduced or eliminated play, or higher feed rates? Do you want climb milling for improved surface quality and longer tool life? If any of these is a definitive yes, then you’ll have to spend the extra money for ball screw axis drives.
additional versatility?
As described in the wait, what? section, the portal itself would also be suitable for other purposes. There are dragknifes for plotting, 3D print heads, and even engraving lasers available that could be fit to the portal if needed.
To prepare for this, a spindle that fits the euro-standard 43mm diameter neck holder possibly is the best choice because most other tools are available for this fit as well, making a conversion more easy.
General
Does it create lots of dust?
Yes. Get a proper dust collection. I’d recommend a cyclone system or one of these huge textile bag collection thingies that are usually used with table saws. If you’re using your machine regularly, even a shop vacuum alone might not have the holding capacity you require.
You should also ground it well (e.g. by connecting its ground wire(s) to your switchbox’s ground point) and buy antistatic vacuum hoses which you can connect to the vacuum’s or the dust collector’s earth. This way, you avoid getting bzzz‘ed everytime you touch vacuum-related things plus you can exclude one hard to spot reason for your machine going mad, e.g. sudden software freezes, control randomly detecting Emergency Stop events, phantom reference switch clicking or even stepper pulse hiccups. There are many appearances in diverse forums where this was or could have been the culprit, e.g. here.
Is it loud?
Yes. The sound level is comparable to a hand router. It is loud in idle already, and it gets worse when you plunge through material. So it might be a good idea to either buy the quieter but more expensive high-frequency spindles with external cooling. In addition, your machine should (and according to your local regulations even might have to) get an enclosure for safety reasons, but also for additional noise reduction. It will also help reduce fine particle dust.
But sound also heavily depends on the bit you’re using. In my experience, large diameter, 10mm shaft, short bits sound more pleasant and are maybe even less noisy than smaller diameter or long cutters.
What is the workflow?
Here’s a simplified image of the workflow with a CNC machine.
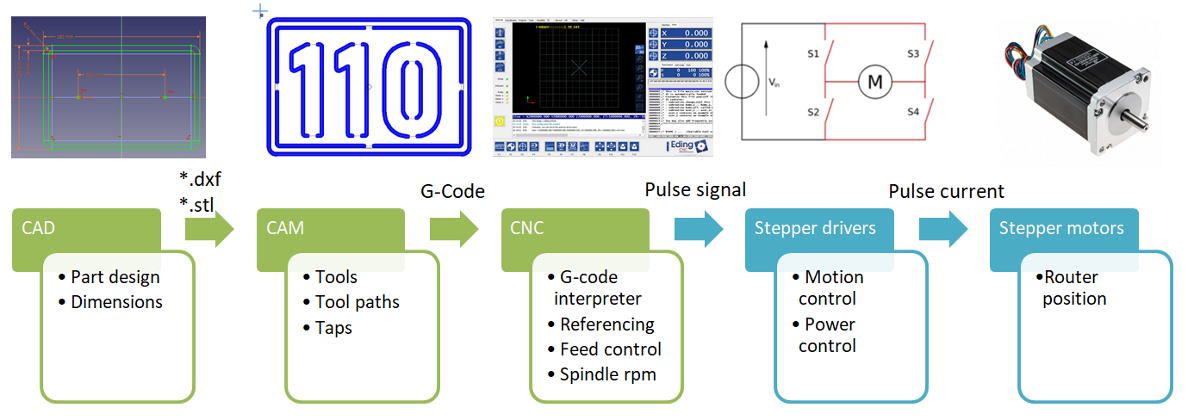 Similar to hand-crafting, it all starts with an idea. Parts drawings and dimensioning are made in a Computer Aided Design tool instead of on a blank sheet of paper. The drawing or 3D model file is then further proessed in a Computer Aided Manufacturing tool, where suitable router tools are selected, the milling strategies are defined, and the toolpaths generated. The resulting G-Code file is then sent to the actual CNC software which controls the stepper motor drivers. They are sending current pulses to the stepper motors which then mechanically move the machine to create the part.
Operational
conventional or climb milling?
This is a choice you make in your CAM tool.
Conventional milling = the router bit “carves” the material, its cutting edges rotate against the direction of material transport. Table saws e.g. always use this to avoid kick backs. Climb milling = the router bit “eats” into the material, its cutting edges rotate with the direction of transport. The cutter tends to pull itself into the material. More reference e.g. on harveryperformance or tormach’s blog.
Which of the two you should choose depends on your machine’s stiffness and weight, your stepper motor’s holding capabilities, the power of your stepper drivers, and the material you’re working with. If you have a stiff, heavy, powerful machine (with ball screws) and work with materials on the soft side, use climb milling. Watch your machine closely to see if all feels and sounds (!) smooth. If in doubt, use conventional milling. For hand-operated routers, always use conventional milling!
How to create easy and quick workholding?
This again depends on your stock:
- Big Sheets: Vaccuum table or guard fence with clamps that pushes your sheet against the fence
- Small sheets: Clamps or bolt-down to table
- Small blocks: Vise
- Irregular shapes: Clamps that force the stock down to the working table
- Dual side milling: Fixtures you should mill and glue the stock to for this specific project
Hmm, the spoilboard with guard fence will likely be one of my first projects with the new machine.
Which bits / end mills to start with?
I’d recommend the following general mills for a start. They should of course match your material in their making, spiral type, flute count etc.
- Classic 6mm or 1/4” upcut end mill
- 2mm upcut end mill for fine stuff or small holes
- 90° engraving mill for chamfers and engravings
- Face mill of your choice for huge surface milling
- ball-nose mill for 3D smoothing
My focus is plywood, what are suitable feeds and speeds?
Birch plywood is hard but forgiving. Suitable values always take into account machine stability, power and spindle performance.
Remember: You want your bit to cut chips, not create dust. That’s why you should avoid low feed rates at high spindle RPM. For starters in wood: use half of your tool diameter as depth per pass, calculate the spindle RPM using feeds & speeds formula or a calculator from the internet, and try these out. Look at the chips. Listen to the machine while working. Does it sound “good”? Increase depth per pass or feed rate gradually, stop at where either your spindle sounds stressed, your finish deteriorates, or you feel less confident with your machine. Turn back again just a notch, and that might be your ideal feed rate & depth per pass settings for material and mill you’re currently using.
For my machine, I confidently chose F 3500mm/min = 138in/m at S 24000 RPM and a depth increment of the mill’s diameter Z 6mm, and lane-by-lane feed of 90%. For your reference, I used the websites cnccookbook, cnc-lehrgang, and tool manufacturer’s websites like Sorotec’s to calculate mine.