
QR-Codengrave
Project stats
- Difficulty: hard 4/5
- Cost: 0€
- Time: ~50h
The idea
A friend asked me to fabricate a coaster for him. A custom logo, some letters. Nothing too interesting. On the backside, he wanted to have a QR-code engraved that keeps a link to his website.
So I had a QR-code created with a standard web-tool and exported as .svg. Unfortunately, in my CAM I’d have to klick every single pixel and create a carve action for that pixel, which would take quite some minutes of my time for click-select-and-enter-value procedures. Plus, I’d have to use a tapered tool and V-carve to get a square pixel which takes much more machining time than a round pixel representation.
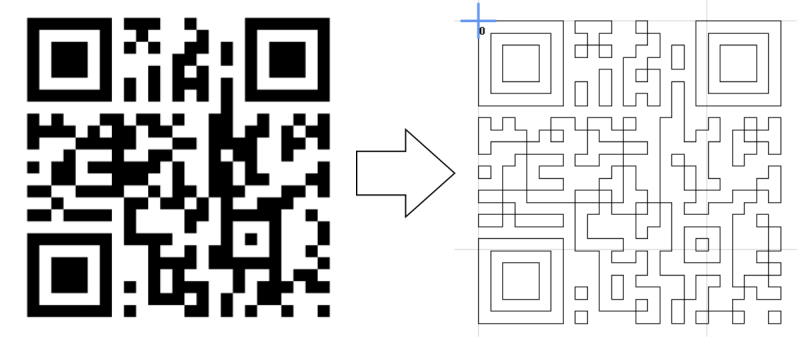
That’s where I decided to throw many, many more hours of my time at this problem and come up with a generic solution for QR-code engravings - a piece of software named QR-codengrave.
Getting started
Specification
This is what I wanted the tool to do:
Must-haves:
- Take a text input and convert it to a QR-code. No additional config to be done by the user.
- Provide an option to manage different CNC tools.
- Provide inputs for engrave parameters: engrave depth, in-job rapid movement hover overs, flyover height
- Provide inputs for custom workpiece XY0-offsets
- Vectorize the QR-code’s pixel output
- Have paths created from the vectors, for simplicity start with an inwards spiral
- Handover the paths to a module that uses the selected tool’s parameters to create machine paths
- Have the machine paths converted to G-code that can later be interpreted by my machine
- Thoroughly verify the algorithms with automated unit tests (no crashes in the physical world please)
- Provide a graphical user interface to make parameter input as simple as possible
Optionals
- Have a Continuous Integration pipeline created both for my IDE and Github Actions
- Have a Continuous Deploy pipeline created for my IDE (PyInstaller) and Github Actions (Artifacts, releases)
- Add integration tests for the GUI
- Optimize the path generation algorithm as “inwards spiral” has a high manufacturing quality and is nice to look at but is not very efficient.
Uncertainities
At the beginning of this project, I had some open questions and risks that could have limited usability of the program or even make the whole project unfeasible. They all turned out to be wrong (thankfully), but still these were the risks that could have rendered all my work useless:
- Cameras won’t read round dot-as-pixels QR-codes
- The contrast my engraving materials provide is too low so read results could be erratic or not obtainable
- Machining time could be very high, making the project uneconomic
- Limitations of programming tools or my abilities to code could increase development time to where it’s not worth putting more effort into
That’s where I decided to write unit tests along with the code to get quick feedback about whether my code could do what it should. And I limited the program’s functionality to one engraving strategy and the GUI to only show a preview of the QR-code, not XY-offsets or other fancy stuff for a start.
Programming language
I took some sheets of paper and noted down the essentials.
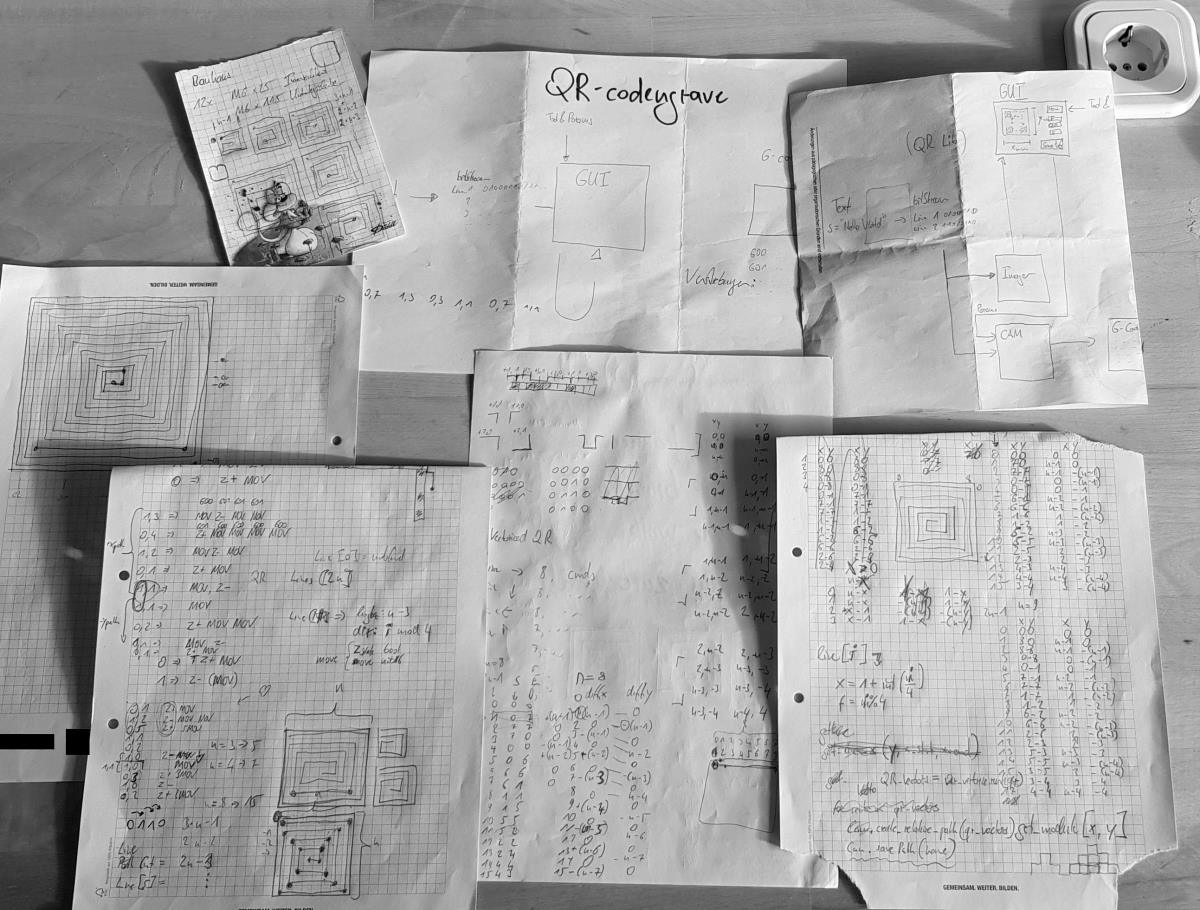
One module shall take care of creating a QR-code from text input, another one should create vectors and paths to have that QR-code engraved, and a GUI in the middle shall host the text input, a machining preview, and input options for milling tools, engrave parameters, and workpiece offsets.
I had a couple of programming languages that I “speak” well enough to choose from:
- C++ with QT framework
- Java
- Python with Tkinter framework
I decided on the - in my view - most simple solution to have a running prototype as quickly as possible: Python with Tkinter. I know tkinter from an earlier project of mine and although it has its caveats and limitations, it’s still powerful and quick to setup.
Proof of concept
I did some research and found a pretty good open source QR-code library on the web that’s available also in Python. Based on its output, I created a vectorizing algorithm that could interrogate the QR-code library to return values of the QR-code’s pixels in a scan line:
    def _qr_bitstream_from_line(self, line):
        """Creates a bitstream from an input line of a QR-code data representation
        :param line: a QR-code data representation (line of bits within the QR-code)
        :returns bitstream: returns an array of bits reflecting the QR code's state at the respective
        point of the line."""
        bitstream = []
        if line.get_direction() == Direction.RIGHT:
            for x in range(line.get_p_start().x, line.get_p_end().x + 1):
                bitstream.append(self._qr.get_module(x, abs(line.get_p_start().y)))
        if line.get_direction() == Direction.LEFT:
            for x in range(line.get_p_start().x, line.get_p_end().x - 1, -1):
                bitstream.append(self._qr.get_module(x, abs(line.get_p_start().y)))
        if line.get_direction() == Direction.UP:
            for y in range(line.get_p_start().y, line.get_p_end().y + 1):
                bitstream.append(self._qr.get_module(line.get_p_start().x, abs(y)))
        if line.get_direction() == Direction.DOWN:
            for y in range(line.get_p_start().y, line.get_p_end().y - 1, -1):
                bitstream.append(self._qr.get_module(line.get_p_start().x, abs(y)))
        return bitstream
Then, I had to create vectors from these lines, so that consequent pixels with the same values could be merged to a line that’s much quicker to manufacture than multiple dots:
    def _vectorize_bitstream(self, bitstream):
        """Creates a QrLineData object from an input bistream
        :param bitstream: an array of bits = a line of the QR-code
        :returns line_vector: A list of QrLineData objects"""
        line_vector = []
        data = QrLineData(bitstream[0], True)
        for bit in range(1, len(bitstream)):
            if bitstream[bit] == data.get_state():
                data.add_length()
            else:
                line_vector.append(data)
                data = QrLineData(bitstream[bit])
        if not data.get_state():
            data.finalize()
        line_vector.append(data)

        return line_vector
These two methods would now be called by a supervising method that knows a spiral path through the QR-code. My first GUI just had three elements: An entry field for the text to be converted to a QR-code, a button to run the algorithm, and an output canvas where the algorithm’s engrave path would be drawn.
By the way, I used the Turtle module to draw the vectorized QR-code path, a tool that’s been written for college kids who take a dip into program lamguages like Python. It is slow but was easy to setup so that was enough for me to get started with. I hard-coded it in to save time, and my loops are more C-ish than pythonic but nevermind.
        for vect in self._spiral_path[i].get_z_vector():
            if self._stop_draw:
                break
            length = vect.get_length()
            if vect.get_state():
                self.turtle.down()
                self.turtle.forward(self.pen_size * length)
                self.turtle.up()
            else:
                self.turtle.forward(self.pen_size * length)
        self.turtle.right(90)
This very simple concept looked promising to me but I had to tweak it a couple of hours because my initial output looked like this:
QR-codengrave GUI test
Still, after a while I was able to reliably draw a (21x21 Pixel) QR-code on screen, and use my smartphone’s camera to yield the webpage link. 🥳 Yeah!
QR-codengrave vectorizer working
Unit tests
The “platform” parts - vectorize_qr and machinify_vector modules both contain a lot of verifiable calculations and business logic. That’s why my tests with Python’s standard unittest module are quick and easy to write. This is an example where I verify that the line class I created correctly calculates a length (n+1 style):
class TestLine(unittest.TestCase):

    def test_line_x_calculates_valid_length(self):
        line = Line(Point(0, 0), Point(5, 0))
        self.assertEqual(6, line.get_abs_length())
But it quickly became more complex when I wanted to test whether the output of the QR-Code generator library is handled correctly in my program. For that I had to inject the library into my class under test so I could sneak a mock implementation in that’s then interrogated from within the test.
This pattern of dependency injection is very similar to how it’s done in C++ where I’m much more proficient (see a project here or another one there, for example), only that in Python far less boilerplate code is needed to get there. Some internet research helped me write the following test case:
    def test_bitstream_qr_input_loop_xpos_correct(self):
        mock_qr = QrCode.encode_text("schallbert.de", QrCode.Ecc.MEDIUM)
        mock_qr.get_module = MagicMock()
        cam = VectorizeQr(mock_qr, 1)
        cam._qr_bitstream_from_line(self.test_line_x)
        mock_qr.get_module.assert_called_with(20, 0)
I inject the “real” QrCode library but with one mock method which is of interest to me, get_module(). In the test, I’m asserting that it is called with the expected parameters from within my class under test.
With these tests in place, I can be pretty sure that the building blocks of my algorithm work as intended, and that regressions are quick to be found.
The long way to Minimum Viable Product
Boosted by this quick win, I went all-in. I had to design a tool selector before implementing the G-code generator because I’d have to have the tool properties available before setting dimensions and tool speed / feed for the QR-code engraving action.
After some unsuccessful tries in the main window, I decided the tool config window should be a dialog instead (that Tkinter calls Toplevel) so tool parameters can be entered and sent back to the main GUI once complete. I made the dialog modal with
self._dialog.grab_set()
So it would always have focus to avoid trigger several instances of this window. I keep the configured tools in a numbered list so once fed, the application would provide the list so the user could select the required tool for the job from a dropdown menu.
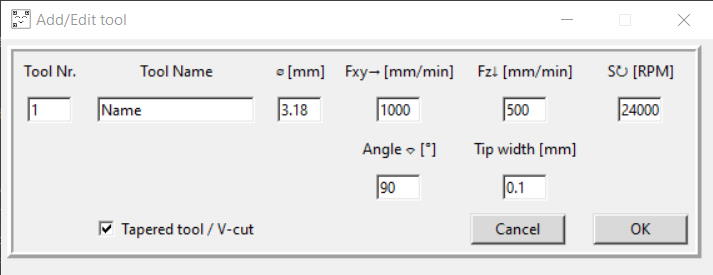
With this step, I had to implement two things:
- Checks for value type and range
- A Persistence module so that entered tools would survice an application restart.
Value type and range checks
This could be accomplished using an event hook within the Entry Box widget like so:
    reg = config_tool_frame.register(validate_number)
    tool_nr_entry.config(validate="key", validatecommand=(reg, '%P'))
And then handing over the entered value to a simple validator that just tries to cast the input value into a float and returns False if that generates an error,
def validate_number(entry):
    """Helper function that is used in validators to check
    that the entered keystroke is a number"""
    if entry == '':
        return True
    try:
        float(entry)
        return True
    except ValueError:
        return False
Range checks would be made not when something is typed into the fields, but only when the OK button is pressed to relay the entered data back into the application. Once out of range, a warning Popup (tkinter.messagebox module) would appear pointing to the possible issue.
Persistence
The Persistence module was a bit less easy to implement.
I decided on creating an item what C++ guys would call a static class, i.e. a class that doesn’t have to be instantiated to call one of its methods. This class just has two methods called load and save that do what their name suggests using Python’s pickle for serialization of objects that I wanted to be persisted. In Python, I used the @classmethod decorator to indicate the static nature of that class.
Have a look at how simple data serialization can become with the right tools:
    with open(app_persistence_path, 'wb') as file:
        pickle.dump([cls._tool_list,
                        cls._z_params,
                        cls._xy0],
                    file, protocol=2)
When this reliably worked, I added an engrave parameter configuration widget.
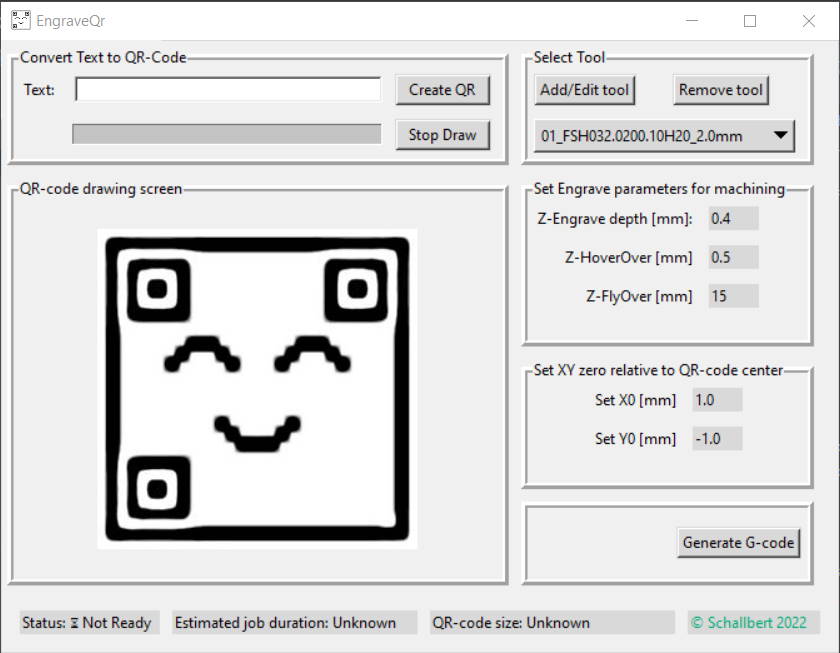
Engrave parameters
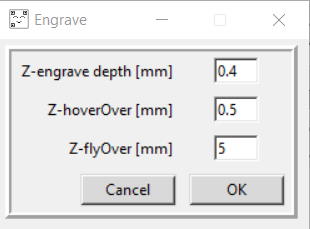 To generate G-code from my QR-code data, I not only needed tool and speed / feed data, but also I’d have to know how deep to engrave, how far above the workpiece’s surface the tool should hover for rapid moves, and what safety height to use for the CNC to return to origin or home.
It is created in a similar manner to the tool_configuration dialog and uses the same mechanisms for type and range checking. The only difference is that it’s launched not with a button click, but via click on a label that shows the current engrave parameter value in the main window.
Workpiece XY Zero offset
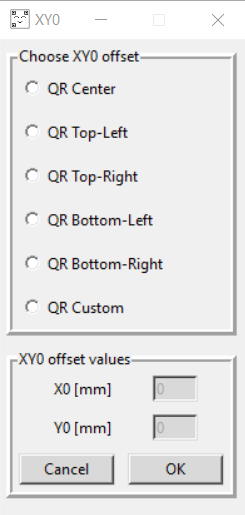 The workpiece offset config dialog features some radiobuttons to select most common workpiece origins, and provides a custom option where the user can enter values for workpiece’s X and Y axis zero.
A function in the background calculates the required offset relative to the engrave spiral’s starting point.
The workpiece offset config dialog features some radiobuttons to select most common workpiece origins, and provides a custom option where the user can enter values for workpiece’s X and Y axis zero.
A function in the background calculates the required offset relative to the engrave spiral’s starting point.
Normally, I wouldn’t want the GUI to do calculations or a lot of branching logic because it’s harder to verify as test fixtures become larger and more difficult to maintain. Still, in this case I decided to do the offset calculation with help of a lookup table within the GUI module to avoid having to communicate through all GUI modules to platform and back (4 classes total comms length).
    def _get_xy_offset(self, offset):
        """calculates an XY coordinate offset from a preset point, taking the selected tool diameter into account.
        :param offset the selected offset from the above enum class
        :returns a XY Point where XY0 is assumed for the engraving."""
        qr = self._qr_dimension
        d = self._tool_diameter
        offsets = {Offset.CENTER: Point((d - qr) / 2, (qr - d) / 2),
                   Offset.TOPLEFT: Point(d / 2, -d / 2),
                   Offset.TOPRIGHT: Point(d / 2 - qr, -d / 2),
                   Offset.BOTTOMLEFT: Point(d / 2, qr - d / 2),
                   Offset.BOTTOMRIGHT: Point(d / 2 - qr, qr - d / 2)
                   }

        if offset in offsets:
            return offsets[offset]
Initial release V1.0
The initial release is a minimum viable product. It does its job but still has some flaws (like throwing an error when there’s no tool selected in the drop-down) and imperfections (like drawing a QR-code is really slow, re-drawing tilts the QR-code a bit etc.) but it should just work, helping the user avoid the worst blunders on their way.
I have tested the execution on my CNC machine and at least my phone is able to navigate to a website just by holding the camera at the workpiece 📱
Automated integration tests for the GUI: frustrating work
When my initial release was out, I wanted to add some tests related to the GUI. As I didn’t manage to have absolutely no business logic there, I at least wanted to verify the range checks as well as the communication with the platform to ensure that it all works as intended.
Stuck in Messagebox
For that, I wrote some tests that ran on my local machine with the disadvantage that when the test hit a warning or error dialog messagebox.showinfo / messagebox.showerror, a manual user interaction was absolutely required to have the window closed and the test to continue.
I didn’t find an easy way to circumvent that issue as the messagebox acts as an independent widget that cannot easily be tampered with. Even my tries to invoke a keystroke as a side effect from within the test did not prove to be fruitful (and, in the end, wouldn’t have been a clean sollution, I suppose).
My solution after a couple of hours cursing under my breath is that the messagebox widgets are injected into the GUI classes that use it:
@patch('src.gui.gui_tool_manage.GuiToolManager')
    def setUp(self, mock_guitoolmanager):
        tk.Tk()  # required to have tk variables properly instantiated
        self.mock_guitoolmanager = mock_guitoolmanager
        self.mock_msg = MsgBox()
        self.mock_msg.showinfo = MagicMock()
        Persistence.set_mock_msgbox(self.mock_msg)
        self.config_tool = GuiConfigureTool(self.mock_guitoolmanager, self.mock_msg, {'padx': 5, 'pady': 5})
This way, I can throw mock_msg into the gui class so not the real showinfo was taken but instead the mock would know whether it has been called as intended. I could add it to the test fixture so my test code itself could stay DRY.
It adds more arguments to the constructor and delegates the instantiation to a higher level class, but still the usage inside the class under test stays trivial.
Static class issues
As the persistence class I mentioned above is static in a way that it doesn’t require instantiation, I had the next issue built in my code right from the start: An integration test would now try to write to an actual persistence.dat file, a dependency that I didn’t want to have, especially not in the continuous integration environment.
So I moved Persistence up the stream into the main GUI file that wouldn’t be tested following Steven Anderson’s splendid blog post. The main GUI should only contain declarative code anyways, and the loaded data is then cascaded into the classes that use it instead of the persistence class that actually does the load/save operation.
Future releases
This is what I’m planning for future releases:
- Drawing speed of the QR-code must be increased
- Graphic bugs (scaling, tilting) and blurry edges of drawing screen to be fixed
- CNC paths to be optimized for lower manufacturing time
- Bugfixes
At least if there are any; let’s see how much I’ll be using this tool. The things that annoy me most will likely be fixed first.
Ah, one last thing: be rewarded for following through on this article. You can download your copy of QR-codengrave for free to play around with, and for home use. If you’re planning for commercial use, please let me know upfront.