Arbeitsabläufe mit FreeCAD
Motivation
Ich habe gerade eine zweite Bestellung für AnywhereAmps Alpha erhalten. Mein erster Prototyp hat bereits ein neues Zuhause, also werde ich mindestens drei weitere Exemplare bauen. Alle Holzarbeiten, die von Hand ausgeführt werden, würden 4-5 Stunden pro Exemplar in Anspruch nehmen, also habe ich mich entschlossen, sie auf den eigentlichen Bauprozess zu beschränken, der - hoffentlich - nur eine Stunde dauert. Dies möchte ich erreichen, indem ich die Holzteile mit einer CNC-Maschine fräsen lasse.
CAD-Werkzeug
Eine solche Maschine würde die Pläne, die ich von Hand skizziert habe, nicht verarbeiten. Also musste ich mich mit einer Software vertraut machen, die 2D-Skizzen in ein 3D-Modell umwandeln kann, und schließlich mit einem weiteren Werkzeug, das die Komponenten des 3D-Modells in eine Bahnsteuerung für die CNC-Maschine übersetzt, mit der ich meine Teile fräsen will. Für die 3D-Arbeiten habe ich die Software FreeCAD gewählt.
Aller Anfang ist schwer
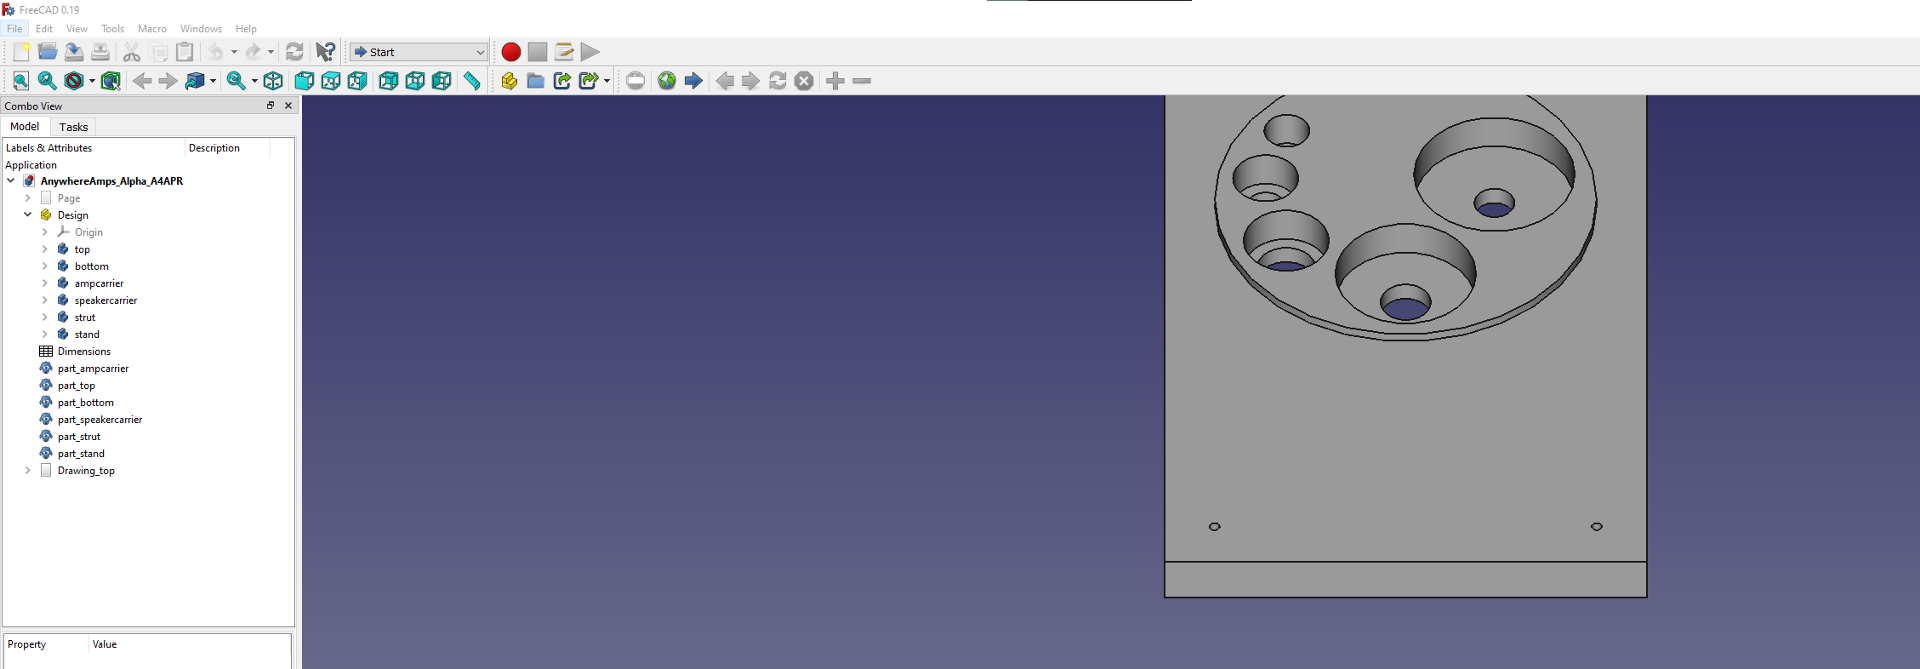
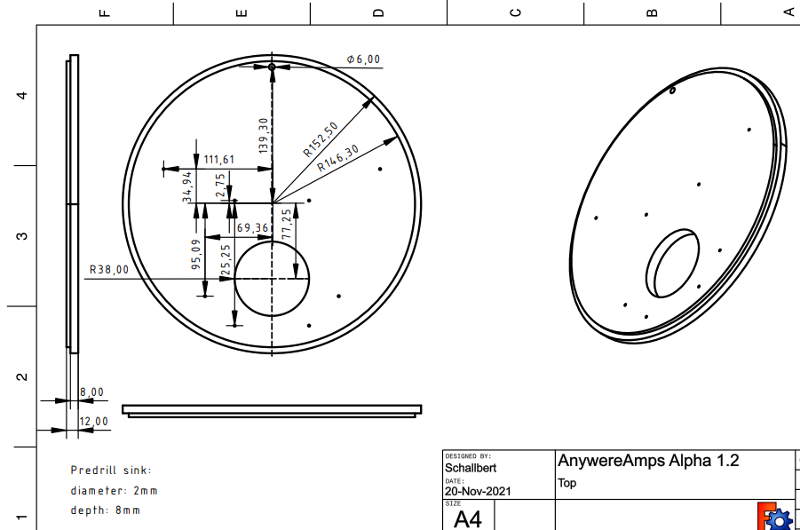
 Aber FreeCAD ist… naja, ich bin halt kein CAD-Designer oder Maschinenbauingenieur. Daher ist der Einstieg in dieses Tool für mich ziemlich schwierig. Glücklicherweise gibt es einige gute Tutorials wie dieses: youtube link, dennoch habe ich einige Stunden gebraucht, bis ich mein erstes Teil gezeichnet hatte. Außerdem ist das, was auf dem Bild rechts zu erkennen ist, noch lange nicht der fertige Entwurf.
FreeCAD Arbeitsablauf
FreeCAD ist meiner Meinung nach (Stand Ende 2021) kein selbsterklärendes Werkzeug. Es ist sehr vielseitig und daher komplex und umfangreich. Da ich es zum Zeichnen von 3D-Teilen und/oder zur G-Code-Generierung verwenden möchte, werde ich nur eine Handvoll seiner Arbeitsbereiche benötigen.
Natürlich können die folgenden Zeilen nicht mehr als eine Schnellstartanleitung sein. Es gibt tonnenweise hilfreiches Material wie ein FreeCad Wiki, ein Forum, und viele, viele Tutorial-Videos usw., die die Dinge besser und ausführlicher erklären als ich es kann.
Erst die Abmessungen - das Modul “Spreadsheet”
Schaffen wir zuerst einen zentralen Ort, an dem wir alle Maße unseres Projekts aufbewahren. Wir werden sie später in den Zeichnungen, 3D-Modellen und Baugruppen verknüpfen, so dass sich geänderte Werte in der Kalkulationstabelle automatisch auf alles andere angewendet werden (für mich übrigens der Vorteil dieses CAD-Programms gegenüber vielen anderen, bei denen quasi von Vorn begonnen werden muss, wenn man die Größe des Bauteils anpassen möchte).
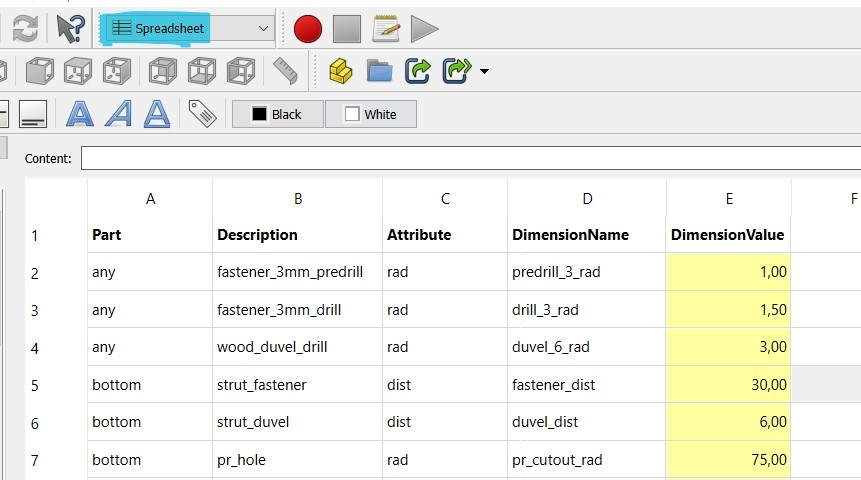
- Wählen Sie das Modul “Spreadsheet” an. Erstellen Sie ein Arbeitsblatt und benennen Sie es z. B. in “Abmessungen” um.
- Tragen Sie Namen Ihrer Dimensionen ein. Ich habe festgestellt, dass es gut lesbar ist, wenn Sie für jede Dimension die Namenskonvention
Teil_Beschreibung_Attributverwenden. - Nachdem Sie den Wert Ihrer Dimension eingegeben haben, klicken Sie mit der rechten Maustaste auf die Zelle und wählen Sie “Eigenschaften”.
- Im folgenden Dialog wählen Sie die “Alias”-Leiste und geben den Namen des Maßes
dimensionNameein. - Nun sind Sie in jeder Skizze in der Lage, diese Maße unter ihrem Alias auszuwählen. Klicken Sie “Save”, um den Dialog zu schließen.
Skizze anfertigen - scetcher in der “Parts Design Workbench”
Nun erstellen wir die erste Skizze des Teils, wobei die soeben erstellten Maße verwendet werden. Am besten beginnt man mit sogenannten Master-Skizzen, die alle Elemente einer Zeichnung in einer bestimmten Ansicht, z.B. auf der XY-Ebene, enthalten. Von ihnen werden dann die für dreidimensionale Modelle erforderlichen Grundriss-Skizzen der jeweiligen Achsenpaare abgeleitet.
- Aktivieren Sie das Konstruktionsmodul “Part Design”.
- Erstellen Sie einen neuen Körper mit dem blauen Baustein-Symbol.
- Erstellen Sie eine neue Skizze für diesen Körper mit dem Skizzen-Symbol. Wählen Sie z.B. die XY-Ebene.
- Benennen Sie Ihre Skizze um, damit Sie sich ihren Zweck leicht merken können. Da Ihre ersten Skizzen die “Master”-Skizzen sind, schlage ich vor, sie “Master_IhrTeilename_xy” zu nennen.
- Doppelklicken Sie auf die Skizze und beginnen Sie mit dem Zeichnen Ihrer Formen.
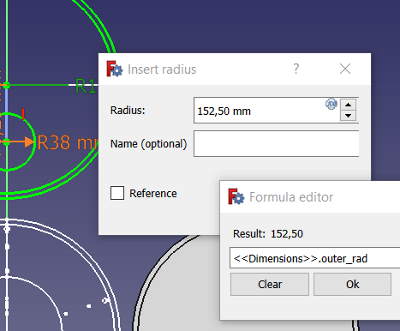
- Stellen Sie sicher, dass Sie Ihre Skizze vollständig definieren (youtube link). Verwenden Sie die Abmessungen, die Sie in die Kalkulationstabelle eingegeben haben, als Hilfe: Doppelklicken Sie auf Ihre Maßeinschränkung und geben Sie “=” ein oder drücken Sie die kleine runde Schaltfläche “fx”. Geben Sie den Namen Ihrer Kalkulationstabelle ein (zum Glück gibt es hier die Autovervollständigung) und dann den Alias der Dimension, die Sie in der Definition widerspiegeln wollen.
- Wiederholen Sie diesen Vorgang für jede Bemaßungsabhängigkeit Ihrer Zeichnung.
Mit Ihren fertigen Master-Skizzen (je eine für jede Achsenkombination) stehen alle Informationen für jeden Drittanbieter zur Verfügung, der Ihre Teile fertigen kann. Wenn Sie das tun möchten, können Sie Ihre Skizzen hier in DXF-Dateien exportieren, und schon sind Sie fertig. Andernfalls: Lesen Sie unten weiter.
3D-Teile erstellen - Teile Design Workbench
Um ein echtes 3D-Teil aus Ihren Master-Skizzen zu erstellen, müssen Sie davon abgeleitete Skizzen erstellen, die extrudiert oder ausgeschnitten werden können. Sie müssen zunächst verstehen, wie FreeCAD Teile und Skizzen baumartig ausrichtet: Jedes extrudierte (3D)-Teil hat eine zugrunde liegende Skizze, die definiert, wie es aussieht. Seine Extrusionsrichtung hängt direkt von der Ebene der Skizze ab. Jedes Teil kann eine oder mehrere Bezugsebenen haben, an denen andere Teile befestigt werden können, die wiederum Teile, Löcher oder Taschen auf dieser spezifischen Fläche bilden.
FreeCAD zeigt nur das “letzte” Mitglied des Bauteilbaums an, das alle abhängigen Teile enthält, die Sie zuvor entworfen haben. Um die Sichtbarkeit umzuschalten, drücken Sie einfach die Leertaste.
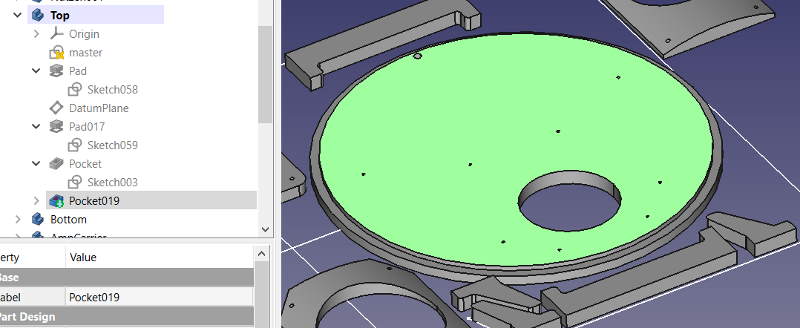
- Erstellen Sie eine neue Skizze in der Baumstruktur Ihres Teils. Dies wird Ihr erstes “Pad” sein, d.h. Ihr eigentliches 3D-Teil.
- Wählen Sie das Werkzeug
create an edge linked to an external geometry(Hotkey “X”) und wählen Sie das Basisteil Ihrer ursprünglichen Master-Skizze aus. - Zeichnen Sie Ihre Form so, dass sie mit dieser Form übereinstimmt, und legen Sie ihre Maße fest, wiederum unter Verwendung der zuvor erstellten Bemaßungstabelle. Sie sollten dies jedoch nicht allzu oft benötigen, da Sie alle möglichen Kanten, die Sie finden konnten, bereits mit Ihrer Musterskizze verknüpft haben.
- Jetzt kommt der spaßige Teil: Schließen Sie die Skizze, klicken Sie dann auf das Symbol
pad a selected sketchund geben Sie die gewünschte Höhe des Teils ein. - Das war’s!
- Um ein weiteres Teil, eine Tasche oder ein Loch auf einer der Flächen Ihres Teiles zu erstellen, erstellen Sie zunächst eine neue Skizze und geben Sie ihr einen aussagekräftigen Namen. Klicken Sie dann auf die Fläche, auf der diese Skizze basieren soll. Wählen Sie schließlich das Werkzeug
set the Support of a scetchund wählen Sie die zuvor erstellte Skizze aus. Wiederholen Sie den Vorgang ab Schritt 2, bis Ihr Teil vollständig ist.
Hm, Ihr neues Teil sitzt direkt auf dem Master-Sketch, so dass Sie es nicht mehr sehen können? Keine Panik, lesen Sie einfach weiter.
3D-Teile anordnen - das Modul “Draft”
Meiner Meinung nach ist es sehr mühsam, Teile in der Konstruktionswerkbank neu anzuordnen. Es wird viel einfacher, wenn Sie die Werkbank “Entwurf” (Draft) für diese Aufgabe verwenden. Auch hier können Sie Teile einfach klonen und nach Ihren Vorstellungen anordnen.

- Aktivieren Sie das Modul “Draft”.
- Wählen Sie das Pad/Teil, an dem Sie zuvor gearbeitet haben, im Teilebaum aus.
- Klicken Sie auf das Schaf-Symbol, um Ihr Teil zu klonen.
- Machen Sie das ursprüngliche Pad unsichtbar, indem Sie die Leertaste drücken, während das Teil aktiv ist.
- Wählen Sie das geklonte Teil aus und benennen Sie es sinnvoll um, z.B.
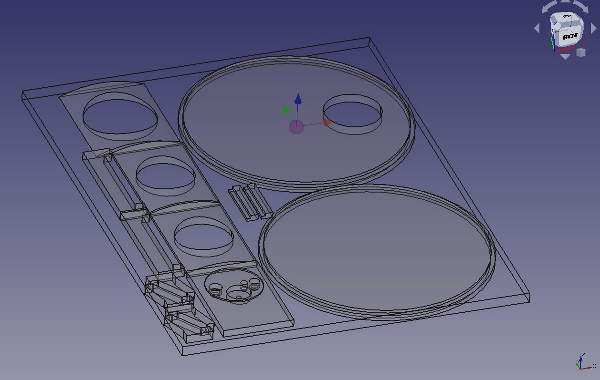
derGerät_part. - Wählen Sie das “Verschieben”-Symbol (im obigen Bild grün markiert).
Eine Verschiebe-Operation besteht aus zwei Schritten: Zuerst müssen Sie die Referenzposition für Ihre Verschiebung eingeben. Entweder wählen Sie den Punkt aus, indem Sie irgendwo in der 3D-Ansicht klicken und dann den Cursor ein wenig bewegen (meine Empfehlung), oder Sie geben den Bezugspunkt in die Felder auf der linken Seite ein und bestätigen jede Achse mit “Enter”. Der zweite Schritt ist die eigentliche Bewegung gegenüber Ihrem Referenzpunkt. Ich empfehle, diese Werte mit der Tastatur einzugeben, da es unglaublich schwierig ist, mit der Maus eine exakte Position anzufahren. Bestätigen Sie mit “Enter”, und die Verschiebung sollte abgeschlossen sein.
Cool, jetzt haben Sie ein Bemaßungsblatt, Master-Skizzen, die Ihre Teile vollständig spezifizieren, die Teile selbst als 3D-Körper und das alles ordentlich sortiert in Ihrer Ansicht!
TechDraw: Erstellen Sie eine klassische “Papier 2D” Zeichnung als PDF
Abschließend möchten Sie vielleicht eine klassische 2D-Zeichnung Ihres Teils exportieren? Zum Glück ist keine schwere Aufgabe.
- Aktivieren Sie das
TechDraw-Modul. - Drücken Sie das Symbol “Standardseite einfügen”.
- Wählen Sie im Teilebaum das 3D-Teil aus, das Sie zeichnen lassen möchten.
- Drücken Sie auf das Symbol “Mehrere Ansichten von zeichnungsfähigen Objekten einfügen” und wählen Sie die Ansichten aus, die vorhanden sein sollen.
- Fügen Sie mithilfe der Symbolleiste Maße, Anmerkungen usw. hinzu.
- Verwenden Sie die Funktion “Ansichtsrahmen ein-/ausschalten”, wenn sich Ihre Geometrien überschneiden, damit Sie sie wieder auswählen können.
- Fügen Sie bei Bedarf kosmetische Linien ein, z. B. um Symmetrielinien zu zeichnen.
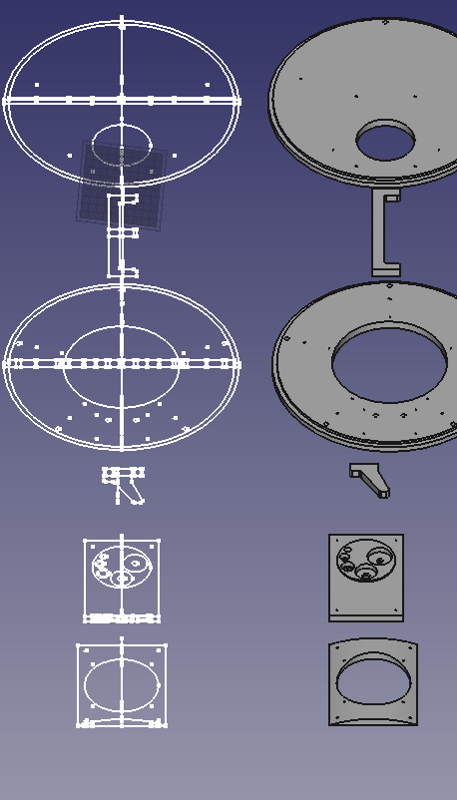
Das resultierende Dokument könnte wie folgt aussehen:
Weitere Informationen zu diesem Modul sind auf dem FreeCAD Wiki verfügbar.